Showing posts with label Collaboration. Show all posts
Showing posts with label Collaboration. Show all posts
Tuesday, 11 January 2011
'The Walk' Short Film
The people depicted here are my family. The story takes place from Summer to Winter. This is a short film I made using stills of their activity with each other, and with the outdoors. The most enlightening and exciting element of producing this was working in collaboration with the composer Brendan Beales. The photographs - their timing and running order - were edited to silence, I then provided Brendan with a total running time, as well as times for various cues and I gave direction for the mood, tempo, and tonality of the music. He did not know which images he was writing for until the piece was completed, this was to avoid 'mickey mousing' the music. Essentially, this production has highlighted for me the pleasure and ability I have, working in collaboration with others towards a larger creative goal. The film and television industry calls all the louder.

Friday, 30 July 2010
Professional Experience Video
This video is essentially a reflective piece which looks at my prior interest and experience in teaching, how that lead me into the role as a student mentor, and what I gained and where I'm looking ahead to, with regards to my professional career.
This was filmed at the end of May, at Coventry University, and with the help and collaboration of the staff and students of the photography course.
Tuesday, 29 June 2010
Theatre Production Photography
Myself and a fellow photography student Oliver Sharpe, have been working in collaboration with 3rd year theatre students at the university. The theatre students were working on their final production for which they needed marketing, promotional, and 'head shot' photography. We saw it as an opportunity to hone our lighting skills and try out some new techniques with an exciting theatre group.
I found working with Ollie to be hugely successful. As a pair (when photographing a large group of people) one of us could take charge of the camera and work with the subjects - concentrating on getting the best shot, whilst the other could concern themselves with all other aspects of the job - checking lights, moving backgrounds, making tea and so on. At a certain point we would swap roles so as to keep the work load balanced and to prevent task fatigue. There is a lot to be gained from having a team-mate who is empathetic to your mode of working, it makes the job a whole lot easier.
I also found the experience of working with a group of theatre students to be beneficial. They take direction well and are comfortable and patient in front of the camera. The challenge was in getting them to appreciate that with photography their acting would now appear as static, rather than dynamic as with theatre. Or in another frame of mind - the challenge was on us to present a still image which did justice to their dynamic performance. People skills and patience were a must with this work, we did make a few mistakes - particularly with the first shoot where we asked everyone to arrive first thing and then they all had to wait whilst we fuddled about with lights - always give at least an hour for set-up before anyone arrives. Thankfully we had a positive and committed group to work with, which made the process enjoyable as well as informative.
Most of the better images went to the theatre team, but I have a few samples here:


I found working with Ollie to be hugely successful. As a pair (when photographing a large group of people) one of us could take charge of the camera and work with the subjects - concentrating on getting the best shot, whilst the other could concern themselves with all other aspects of the job - checking lights, moving backgrounds, making tea and so on. At a certain point we would swap roles so as to keep the work load balanced and to prevent task fatigue. There is a lot to be gained from having a team-mate who is empathetic to your mode of working, it makes the job a whole lot easier.
I also found the experience of working with a group of theatre students to be beneficial. They take direction well and are comfortable and patient in front of the camera. The challenge was in getting them to appreciate that with photography their acting would now appear as static, rather than dynamic as with theatre. Or in another frame of mind - the challenge was on us to present a still image which did justice to their dynamic performance. People skills and patience were a must with this work, we did make a few mistakes - particularly with the first shoot where we asked everyone to arrive first thing and then they all had to wait whilst we fuddled about with lights - always give at least an hour for set-up before anyone arrives. Thankfully we had a positive and committed group to work with, which made the process enjoyable as well as informative.
Most of the better images went to the theatre team, but I have a few samples here:


Friday, 25 June 2010
Filming Assistant
My cousin Jonathan Lee works in the creative industry, as a video maker, artist, educator and other adventures along those lines. One such job he has acquired is working for the crown court producing judiciary 'training videos'. In other words a senior judge dreams up a variety of challenging situations (contradicting laws and such), writes a script, a group of barristers and other judges are hired to play it out, and then Jonathan films and edits the 'trial' into a neat training DVD. Quite a lot of work for one guy, so considering the limited time there is for shooting, he hired me in as an extra hand. I've not done a great deal of filming work before, or certainly not to this kind of professional standard, so at first it seemed rather daunting. However, I soon got to grips with the tasks whilst Jonathan could manage the overall project; he is a very reassuring leader in this way - allowing me to take on tasks within my capability thereby saving him time but still supervising the work at hand.
I picked up a few new technical skills from the specific tasks I had - controlling the 'boom' microphone, and as a secondary cameraman, but the most notable learning I gained, was observing the complexity of film work when there are actors, a set, lighting, a script, and a limited production time, all to be considered and controlled. This complexity is kept in check largely by people management. The director/producer must succeed at two distinct challenges: firstly to produce a coherent piece of video (getting the right shot, well lit, timed etc.) and secondly keeping everybody on set happy (this is especially challenging when there are senior judges and barristers in the room!) Jonathan, I noted, is distinctly accomplished in both these areas - with his easy social air keeping the set very relaxed, and his experience and practised knowledge keeping the production on track. I found I was able to help Jonathan with this (once my confidence had grown) by keeping an eye out for overlooked technical issues, and also contributing to the casual atmosphere of the set (making the odd joke, reassuring actors and so forth). Essentially, a lot comes down to understanding the work environment you are entering into, and how best to behave within it so that everything goes smoothly.
Some 'behind the scenes' stills:


I picked up a few new technical skills from the specific tasks I had - controlling the 'boom' microphone, and as a secondary cameraman, but the most notable learning I gained, was observing the complexity of film work when there are actors, a set, lighting, a script, and a limited production time, all to be considered and controlled. This complexity is kept in check largely by people management. The director/producer must succeed at two distinct challenges: firstly to produce a coherent piece of video (getting the right shot, well lit, timed etc.) and secondly keeping everybody on set happy (this is especially challenging when there are senior judges and barristers in the room!) Jonathan, I noted, is distinctly accomplished in both these areas - with his easy social air keeping the set very relaxed, and his experience and practised knowledge keeping the production on track. I found I was able to help Jonathan with this (once my confidence had grown) by keeping an eye out for overlooked technical issues, and also contributing to the casual atmosphere of the set (making the odd joke, reassuring actors and so forth). Essentially, a lot comes down to understanding the work environment you are entering into, and how best to behave within it so that everything goes smoothly.
Some 'behind the scenes' stills:


Monday, 7 June 2010
Working with Light - Final Day
The Working with Light module has now come to an end. I can say that it has been an absolute pleasure for me working with the first year students and the staff, in helping to deliver and get the most out of this module. I must say a very grateful thank you to those students that came for the extra peer session days - for inputting their ideas and enthusiasm into making the days a success. As a student mentor, my role is reliant on that level of group interaction and positive response, which makes the whole experience worthwhile. I hope that I will continue this mentor relationship into my third year, and I hope that some of the first years will take on mentoring for the lower years as they progress through the course.
On Thursday, we had the interim critique session, with all the class and tutors reviewing the final pieces before the submission, there was some excellent work shown, a couple of people which stood out for me were Larissa Grace and her street portraits, and Dean O'brien's personal piece. In general I was very impressed with the originality and and range of exciting ideas, which people had made a solid attempt at exploring. As students this is a good approach to our work, one which involves risk rather than security, you have to push yourself and your work.
I hope the blog has been useful, it certainly has been interesting for me to track what we've done. All the posts for this module can be viewed under the working with light tag, if you should wish to recap anything from the sessions.
It may have been noticed that there's been a video camera dotted about in our last couple of sessions, this is because I am making a short video summing up and reflecting on my work as a student mentor. I'm currently in the editing stages and this piece will soon be posted online.
Thanks again to all, best of luck with your new projects, I look forward to them.
See you next year.
On Thursday, we had the interim critique session, with all the class and tutors reviewing the final pieces before the submission, there was some excellent work shown, a couple of people which stood out for me were Larissa Grace and her street portraits, and Dean O'brien's personal piece. In general I was very impressed with the originality and and range of exciting ideas, which people had made a solid attempt at exploring. As students this is a good approach to our work, one which involves risk rather than security, you have to push yourself and your work.
I hope the blog has been useful, it certainly has been interesting for me to track what we've done. All the posts for this module can be viewed under the working with light tag, if you should wish to recap anything from the sessions.
It may have been noticed that there's been a video camera dotted about in our last couple of sessions, this is because I am making a short video summing up and reflecting on my work as a student mentor. I'm currently in the editing stages and this piece will soon be posted online.
Thanks again to all, best of luck with your new projects, I look forward to them.
See you next year.
Tuesday, 11 May 2010
Lighting Workshop
Following our peer session yesterday, this post will outline some of the considerations we should take when using studio and location lighting.
It's boring, but it needs to be covered, so: Safety First
The original link from the strobist blog is here. Do check out strobist, and their series of posts - Lighting 101.
Some more videos which go over the range of equipment you can use with studio lighting.
There's also studiolighting.net and a bunch of others, google it!
But remember, when researching this stuff you are frequently going to run into 'experts' telling you that "this is how you make someone look sexy" or "never use a tripod and always shoot at f5.6" - ignore them. It's not the case that one type of light is 'attractive' and one isn't. It's that there is soft light, and harsh light, restricted, spread, diffused, directional and many other types. It is up to you to decide how to use lighting, to create the effect that you desire. Learn from others the technical, teach yourself the creative.
It's boring, but it needs to be covered, so: Safety First
- Don't plug the light into a battery and the mains at the same time.
- Make sure your light is securely attached to the lighting stand, and when moving it, carry it by the light not the stand (which one is going to break if it falls off?)
- A tip when attaching the power cord, is to wrap it around one of the feet of the stand. This way if someone trips on the wire, the light is less likely to topple over.
- The higher you raise the light, the more unstable it will become. Weigh down the legs with some handy sandbags, or get an assistant to hold the stand (especially if you're outdoors, windy, umbrella, Mary Poppins etc.)
- When setting up the stands give the three legs a wide spread for stability, also with the light on top allow the weight to 'settle' the stand so that it's not under too much pressure.
- Avoid touching the bulbs, they're delicate, and the grease from your fingers is not good for them. Also the modelling lamp in particular gets very hot - try not to have that on for unnecessary amounts of time.
- Take care when attaching/removing the various reflectors (or 'heads') - they will get hot from the lamp. The black plastic bulb covers are for storage purposes only. They will melt very quickly (and expensively) if you use them with the lights on.
Basics with using the Lights
- With the 'cell' button on, the light will trigger when it detects any other flash in the room.
- The 'beep' or 'sound' button will mean the light makes an indicating noise when it is charged and ready for the next shot.
- The modelling lamp has different settings ranging from: off, half-power, equal to flash, to full power. The modelling lamp is primarily there to help you get an idea of where and how the light is falling - where the shadows will be etc.
- The light needs to be synchronised to fire at the same instant that the photo is taken. This is done with either a sync cable (from camera to light) or radio triggers (a transmitter on the hot shoe of the camera, and a receiver in the sync socket of the light).
- If you lower the power of the flash you need to 'dump' the charge to reset it.
Some Further Tips
- There's a whole variety of different heads to attach to these lights, which will alter the angle, the spread, the diffusion, the intensity and so on. The best way to find out what different effects these have is to test them out. Yesterday we found that having an umbrella closer to the light source will give less 'spread out' light, i.e. more defined shadows, than having it further away.
- Keep it simple, if one light will do the job then use one light. It starts to get complicated when you've got multiple flashes going off, and you're trying to keep them all balanced and stop them from spilling into each other.
- If you are using multiple lights then perhaps work by 'building up' the picture - start with your key light and get it the way you want it, then add the next and get it balanced, then the next and so on.
- Make use of reflectors and gobos, to bounce back and block off light - give yourself more control.
- If you're working in the studio it might be an idea to isolate the subject from the background, so as to control the light/tone of them separately.
- Use your light meter, and use it wisely - arrange things carefully and take lots of readings. You should have a good idea of how a picture is going to come out before you go near the camera.
- Remember everything is a variant. If something doesn't look right there are numerous ways you can alter it: the power of the light, the angle of the light, the distance between light and subject, the position of the subject, the position of the camera, the exposure of the camera, the list continues.
Here's a good video on Dean Collins (a master of lighting) working on a portrait. It's a bit geeky and technical but it's particularly significant to what I was saying about 'building up' a picture. Also note how he talks through the picture with his assistant - some awesome pre-vis skills.
The original link from the strobist blog is here. Do check out strobist, and their series of posts - Lighting 101.
Some more videos which go over the range of equipment you can use with studio lighting.
There's also studiolighting.net and a bunch of others, google it!
But remember, when researching this stuff you are frequently going to run into 'experts' telling you that "this is how you make someone look sexy" or "never use a tripod and always shoot at f5.6" - ignore them. It's not the case that one type of light is 'attractive' and one isn't. It's that there is soft light, and harsh light, restricted, spread, diffused, directional and many other types. It is up to you to decide how to use lighting, to create the effect that you desire. Learn from others the technical, teach yourself the creative.
Friday, 7 May 2010
How to make a changing bag.
A changing bag in photography refers to a light-proof portable container with 'sleeves' which allows for work with photosensitive materials when a darkroom isn't available, for instance loading film onto spools, or into a developing tank, retrieving damaged film, or even reloading pinhole cameras. These bags can be purchased for somewhere in the region of £10 to £30. Or you can go for the very cheap, very simple, DIY option.
You will need the following: 3 black bin bags, a fairly light-proof coat (stick it over your head and stand outside to check), sticky tape, rubber bands, and scissors.


The other part of the day with the 'Working with Light' group, was spent discussing last week's inspiration film and lecture, followed by a quick workshop Q&A on using a light meter. Further technical assistance with pinhole work, exposure reading, lighting and so on, is scheduled for following weeks and also available on request.
You will need the following: 3 black bin bags, a fairly light-proof coat (stick it over your head and stand outside to check), sticky tape, rubber bands, and scissors.

The steps are:
- Put one bin bag inside another, and square them up nicely (a single bin bag is not particularly light-proof, but two together are).
- About half-way down the bags cut a slit each side, around 10cm long - these will be your arm holes, and be sure to cut through both bags.
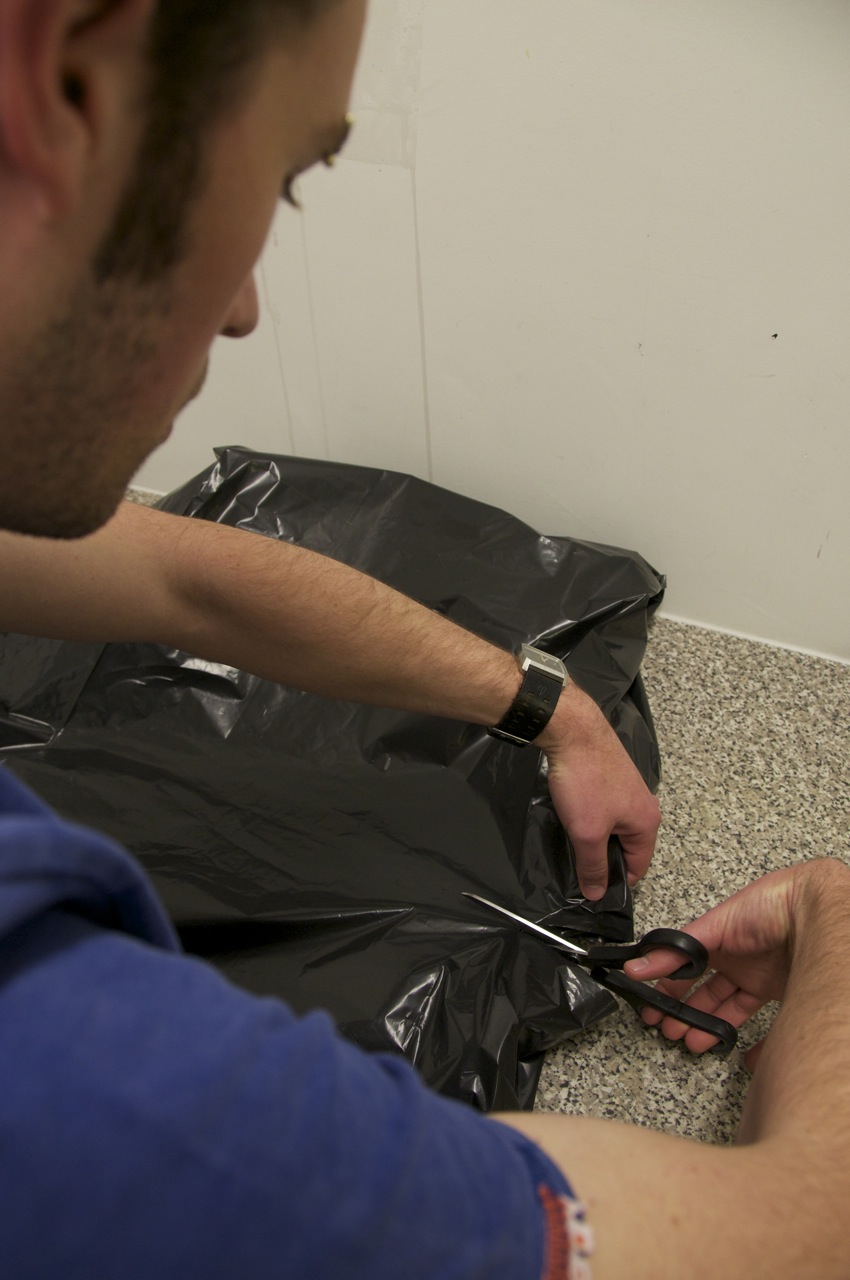

- Use sticky tape to stick the two bags together at these openings - this will help to keep the holes in line.

- Take your third bin bag, cut the bottom off and cut it in half. These two pieces will be used as sleeves.

- Insert the sleeves into the holes on each side, and tape from the inside (turn it inside-out to make this bit easier). Once turned back out, it should have a good shape to it.


- Place the coat into the bag 'head-first' and put the coat sleeves through the bin bag sleeves.


- The changing bag is now ready to use. Put the paper/film/camera in via the bottom, and then fold or scrunch it up and seal it with an elastic band.


The other part of the day with the 'Working with Light' group, was spent discussing last week's inspiration film and lecture, followed by a quick workshop Q&A on using a light meter. Further technical assistance with pinhole work, exposure reading, lighting and so on, is scheduled for following weeks and also available on request.
Friday, 15 January 2010
Natural Light
I started a new module this week - 'Picturing the Body'. We began with a workshop on 'working intimately with natural light'. For this we used a large meeting room, which is a good 20 feet high with a wall of north-facing windows to match. I've always found light from tall windows wonderful to work with, especially if the room goes back a long way. I think it's because when close to the windows the light from above is particularly strong, and then as you move back its intensity is comparatively less (for the camera that is).
In such a large and largely lit space there was lots of potential. Our tutor showed us a tip to see how light falls in any given spot in a space. Originally demonstrated by William Eggleston, you can simply hold up your hand and look closely at the changing quality of light reflected by it, as it moves within the area. By quality I mean the strength of light, the harshness, and the temperature. We worked in pairs, considering how we could use the light around the room and where we could make use of reflectors, and then tying this together with an application of framing.


In such a large and largely lit space there was lots of potential. Our tutor showed us a tip to see how light falls in any given spot in a space. Originally demonstrated by William Eggleston, you can simply hold up your hand and look closely at the changing quality of light reflected by it, as it moves within the area. By quality I mean the strength of light, the harshness, and the temperature. We worked in pairs, considering how we could use the light around the room and where we could make use of reflectors, and then tying this together with an application of framing.


Below is the contact sheet. I always find editing my work and choosing the 'best' pictures to be difficult – I am often indecisive. Our tutor encouraged us to build a frame, and then using a tripod keep that frame, and allow the subject to move/react/pose/communicate within it. I recognise this to be a reliable way toward producing a strong portrait, but I failed to identify this strong frame until after the shoot rather than during it. Consequently I only had a few images to choose from for my 'best' picture. Practice makes perfect.

Subscribe to:
Posts (Atom)
