A changing bag in photography refers to a light-proof portable container with 'sleeves' which allows for work with photosensitive materials when a darkroom isn't available, for instance loading film onto spools, or into a developing tank, retrieving damaged film, or even reloading pinhole cameras. These bags can be purchased for somewhere in the region of £10 to £30. Or you can go for the very cheap, very simple, DIY option.
You will need the following: 3 black bin bags, a fairly light-proof coat (stick it over your head and stand outside to check), sticky tape, rubber bands, and scissors.
The steps are:
Put one bin bag inside another, and square them up nicely (a single bin bag is not particularly light-proof, but two together are).
About half-way down the bags cut a slit each side, around 10cm long - these will be your arm holes, and be sure to cut through both bags.
Use sticky tape to stick the two bags together at these openings - this will help to keep the holes in line.
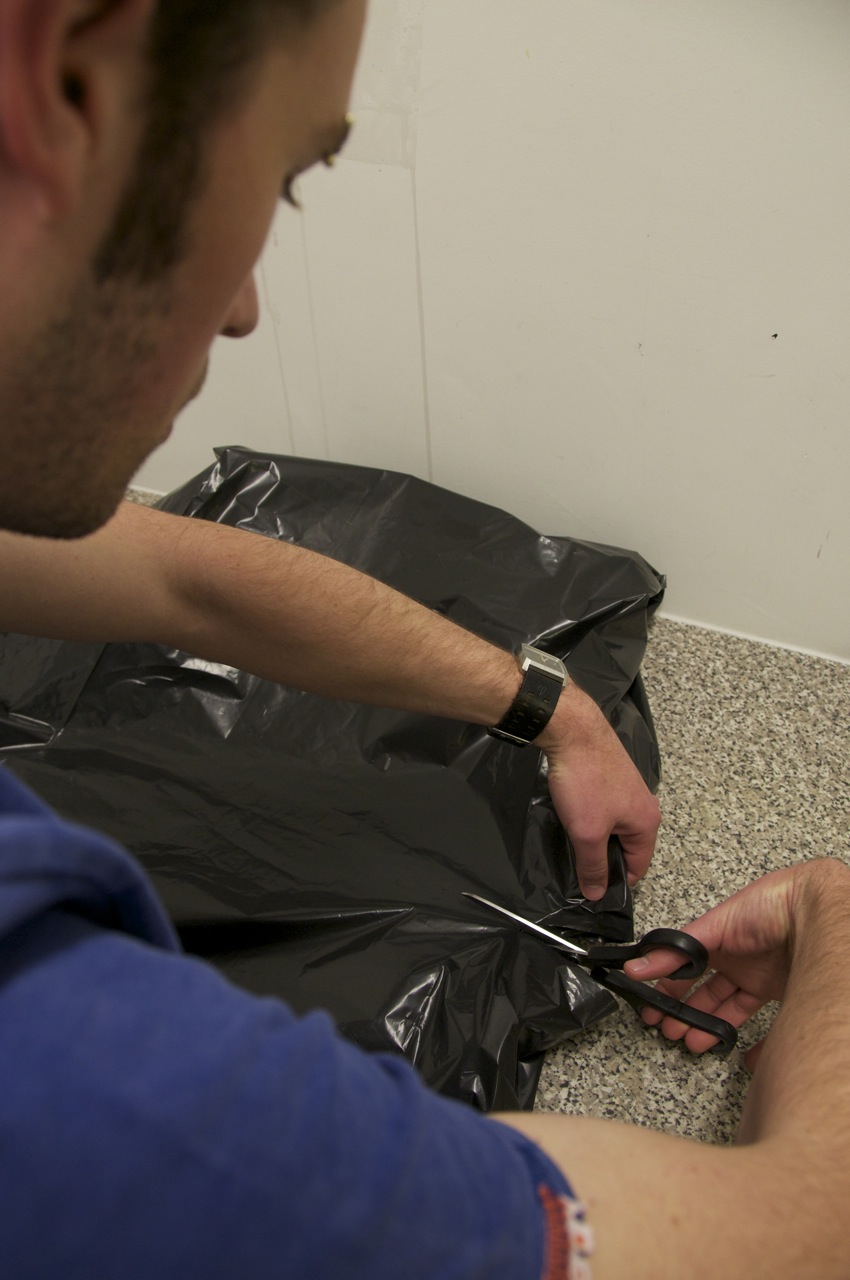
Take your third bin bag, cut the bottom off and cut it in half. These two pieces will be used as sleeves.
Insert the sleeves into the holes on each side, and tape from the inside (turn it inside-out to make this bit easier). Once turned back out, it should have a good shape to it.
Place the coat into the bag 'head-first' and put the coat sleeves through the bin bag sleeves.
The changing bag is now ready to use. Put the paper/film/camera in via the bottom, and then fold or scrunch it up and seal it with an elastic band.
A group of us went out with the bag to work on our street pinhole photography. Working with a changing bag involves a bit of fumbling, but with a bit of practice we were able to reload quite quickly and hence take several pinhole pictures in one outing, and no paper was fogged!
The other part of the day with the 'Working with Light' group, was spent discussing last week's inspiration film and lecture, followed by a quick workshop Q&A on using a light meter. Further technical assistance with pinhole work, exposure reading, lighting and so on, is scheduled for following weeks and also available on request.
This session included a variety of activities all pertinent to our understanding and application of light - to understand it technically, and then to explore applying it creatively. We had a session with Wonathan in the studio with light meters and ambient lighting, doing some basic portraiture (hatchet lighting, silhouette, exposing for shadows, exposing for highlights). To recap when using a light meter:
positioning is important - light/shadow can alter dramatically over a short distance, make sure you get close to your subject (if it's a person I always favour plonking it on their nose).
likewise angle - the meter will read all the light falling into it from the area it is facing, hence it will most often be facing the camera (but not always, there's no rule here)
the meter will always measure at Zone 5 i.e. give exposure settings such that the metered area will be exposed as a mid-grey tone, or in other words 'correctly' exposed. Zone 0 is complete black/shadow, Zone 10 is complete white/highlight.
the meters give precise aperture readings with increments within the f-stops. For example a reading of f16.9, or f16 and a full bar, pretty much means the next stop up - f22.
We then had an exercise outside looking at natural light, observing its changing behaviour as we move in, through, and around a space. We experimented with a few shots, and this led us to think about image management - how are you going to frame a given subject? Are you going to move the subject within the light? Or alter the light? It's very important to note that there is no right answer to a well lit or 'good' photograph. Lighting will be taught as a technical skill, how it is used and applied is up to you. Keep your eyes open and take notice of the behaviour of light around you. You will start to predict how a given scene will be exposed in a camera, or how you make use of a certain light with a subject. This is pre-visualisation - understanding the difference between the eye and the camera, and as with anything it comes best with practice and experience.
This week's lecture looked at a range of practitioners' work where light is used as more of a defining feature, rather than a taken-for-granted element. Quite a lot of practitioners' work was shown, and hence a lot of ideas and potential inspiration passed on. I'm just going to pick out a few which stood out to me, and try to sum up the overall message of the lecture, I'm hoping to hear from other students of 'light defined' work which has inspired them.
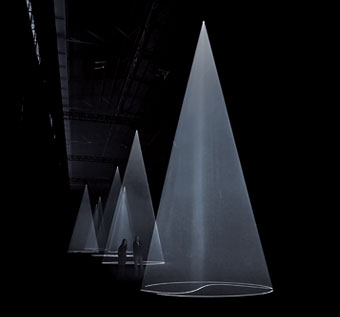
Anthony McCall's, and James Turrell's installation pieces encourage interaction and appreciation of light in a pre-designed space or environment. Shonathan referred to these works as 'Light as the subject'. James Turrell said:
"A lot of people come to art and they look at it - and this is one of the problems of contemporary art - they don't actually enter the realm the artist was involved in."
We then moved on to look at work which used 'Light as a Measurement of Time'. This began with Eadweard Muybridge's sequences of humans and animals in motion. His work effectively paves the way to the concept of video (moving image from numerous stills/frames a second), and other effects such as time-slice, and the famous bullet-time from The Matrix.
Eadweard Muybridge
Harold Edgerton was one of the first to use high speed photography, precisely synchronised to capture a moving bullet - amongst other things.
Harold Edgerton
Anton Giulio Bragaglia
Anton Giulio Bragaglia invented a process that he called 'photodynamism'. He was interested in portraying time and movement as an indivisible reality rather than segmenting or fracturing it into moments. This leads us quite nicely to Jonathan Shaw's work, which draws upon many of those mentioned above, and as he states on his Twitter bio - "I drill holes in cameras and pull them apart to make pictures which explore photography and time." A favourite piece of mine is Gallery 13, which was shot in the same gallery it was shown in, thereby exploring the viewers relationship to the work through their sense and awareness of the space in which it (and they) reside.
This finished off our lecture on 'Playing with Light'. A further link is to Michael Gondry's music video for the Rolling Stones - made entirely from stills.
Inspiration - Obsession
The final thing we did during the day was to watch John Waters' film Pecker: a light-hearted venture following the story of a happy-go-lucky obsessive photographer, and the consequences to his life when he makes it big on the art scene. I unfortunately missed the end of the film, and so would be grateful for other students to post their reviews/opinions on it.
Next week Shonathan has asked us to stick up on the wall a sample of our work produced so far for this module. The aim I think is for everyone to share their experiences, ideas, inspirations, successes etc. to date, encouraging this attitude of shared learning. And hence we should aim to stick up absolutely everything we've been working on that's interesting, regardless of any fears we may have of it being scorned, or thought of as a 'poor' image. Our peer session on Wednesday will be a chance to prepare for this group critique.
We'll also have a look at this week's portrait task - which as Wonathan put it - "is to return to your chosen street location, and investigate a character who exists within, or is involved with that space, by photographing them."
Most of the class have had little to no trouble in making a working pinhole camera. An area I'm going to cover briefly here is using a light meter with pinhole to achieve more reliable exposures. I'd recommend this considering that it's not so simple to reload and re-shoot your cake tins and matchboxes, and it's worthwhile having the confidence to get a shot right first time.
As we know, there are three variables which will determine the exposure of a photograph - the shutter speed (which we can easily control) the ISO (which we know depending on the 'negative' we're using - film/digital back/photo paper) and the aperture (which we need to calculate). This calculation is simple:
Measure in millimetres the focal length (distance from the hole to the paper/film/sensor). If this is curved i.e. varying focal length then I suggest you take an average. For my cake tin it's about 135mm.
Measure the diameter of the pinhole in mm. Suggest you use a precise metal ruler with half mill increments to get a good estimate, and hold it up to the light to see the hole clearly. I estimated mine at 0.75mm.
Divide the focal length by the diameter, and this is your f number or aperture. So my camera has an aperture of f180. (135/0.75 = 180)
My camera uses photo paper - which generally has an ISO somewhere between 2 and 10. I was using Ilford multigrade and spent a bit of time testing that, and found it to have a sensitivity of about 4. If film it will be whatever the film is: 100, 400 etc. and obviously digital you can alter freely. So now you know two of your variables, you can use those figures in your light meter and the available light will determine the third - shutter speed.
It gets a bit tricky because most light meters do not go up to such high aperture numbers, so you may have to take a reading and then 'step up' along your f stops, doubling the time as you go to, until you reach your aperture number. For example if I get a reading of 1 sec at f22: f32 is then 2 sec; f45 is 4 sec; f64 is 8 sec, f90 is 15 sec, f128 is 30 sec; f180 is 1 minute, and hence a 1 min exposure.
An example of an aperture table can be found at the back of the 'Pinhole Pictures' handout (also found in the library) and this link explains the whole process nicely too:
Here's a pinhole picture I made with a four-way camera - holes arranged squarely, and paper coiled round in a circle in the middle. The negative came out like this:
It's then a simple case of contact printing that negative (with a test strip of course) to get your positive picture. Bear in mind that it's a good idea to have your enlarger fairly bright for this to get light through the paper, and you will need glass to keep the negative pressed flat and the image in focus.
Today's session was primarily focussed with the street photography pinhole task. There was a bit of discussion around Sean O'Hagan's article, and we had a look at the work of some of the contemporary photographers mentioned in it. Matt Stuart, Stephen McLaren, Stephen Gill, and Paul Graham.
Matt Stuart
Stephen McLaren
Stephen Gill
Paul Graham
Noticeable that the first three all work in London, which I think, as a location for a street photographer to work with, will differ largely from Coventry. Stuart's and Mclaren's work in particular, both deal with 'instant moments' and slim opportunities. They shoot an incredible amount of photographs, of which a very small percentage are shown. Obviously this is not quite viable with pinhole, but we can still draw aspects from their work - the clever composition arrangements, the humour, the reliance on natural light, the display the unusual and the quirky of 'the street' - and then take these further, or in a different direction, with our pinhole format.
We also had a technical surgery, post to follow on that.
To all 'Working with Light' students: this blog will now host weekly posts covering what we go over in our support groups, whether that be technical issues, post-lecture discussion, feedback on peer's work, links to inspiration and so on. This is a space for you all to contribute to, so please get happy commenting with your work/ideas/research etc.. Please note these support groups will take place on Mondays from 10am in the outer darkroom.
Thursday 22nd April
Jonathan Shaw introduced the module, we questioned 'what is light?' (and will continue to do so throughout the term). We started by watching a film by Mike Figgis: Timecode. I enjoyed the film largely for its original format and delivery, more than its plot or message. At first frustrated by its awkwardness, but then soon (as we discussed afterwards) adapting to it by allowing the changing audio to manipulate our selected viewing. I found myself evolving with this process - listening to the conversation of one character(s) and looking to the silent actions of another, to keep track of them all. I also thought that this could be a film to be re-visited - with more to be discovered when the viewer doesn't need to follow the plot and so can look for the finer actions/behaviours of the characters. A point to remember with our photography - can we produce something original which will hold a viewers attention, perhaps even encourage them to revisit it and/or discover more? We all know how easy it is to blitz round a gallery, skimming over others' work.
We were given the article Why Street Photography is Facing a Moment of Truthby Sean O'Hagan. Looking to the quotes of the article, there are some quite useful insights into photographer's attitudes when approaching 'street photography' -
"It's essentially a way of working wherein you have to be utterly open to what happens on the street. So, no props, no models, no setting up of shots, and you always use available light. Then, it's down to a mixture of happenstance, luck and skill." - Matt Stuart
"I'm not really drawn to a lot of the ideas around street photography, the notion of waiting around for something to happen, an accident or a man walking by an odd sign or things like that. What I do is always carried by the subject. In this instance, I was totally reacting to a place that I had stumbled on, and the place completely moulded and shaped the work. I was reacting, really, rather than going out looking."- Stephen Gill
The article also pointed out something of a gap between street photography and its place in the art world, because it is too grounded or authentic in some way. Hopefully we can bridge this gap with our pinhole work. Which leads to the task for next week - to photograph the 'street' using our pinhole cameras, and taking into consideration the points discussed in this article. When we say 'street' what we're really talking about is the public place. I started to question what defines that place - somewhere everyone and anyone has the right to be, and hence where you can expect to meet anyone - an absence of privacy. How does a camera (as an objective viewing tool) fit into such a place? Or how does a photographer (as a subjective 'eye') enter into and engage with it?
I'd mention to students that with this task it's important not to get hung up on the technical restrictions of pinhole, but rather to enjoy them. If all you've got is a bloomin' cake tin then how are you going to get something from it? This task is not looking for perfectly focussed, lit, exposed, framed images, instead it's looking to break the mould, and (pardon the cliché) get you to think outside the box. I think this is what the module is really about, pushing the boundaries, challenging the thinking we take for granted when photographing. And as wise Wonathan put it - "if you're not enjoying it, stop it and try something else."
For those who haven't seen it, here is my post and video of the Camera Obscura I made. Recommend that everyone has a go at this - very simple, very cheap, very interesting, and educational towards pinhole cameras.
See you all on Monday - peer review and guidance for 'street' task, post-lecture discussion, pinhole camera surgery. No hangovers allowed.
These days I seem to be spending an increasing amount of time in front of the computer. Alongside this comes ever greater opportunities for distraction and mind wandering. Whilst wandering, one has ideas.
Most of these events (or performances) actually occurred before I thought to video them, from being bored, daydreaming, imagining, performing, then laughing; and then considering to share them. Narcissism, performance, self-mockery, a desire to be funny – a lot of this rationale goes back to when I began my nude work. I'm not quite in this place with my main 'bodyscape' work, but I'm still quite intrigued by these themes, and I have some ideas for future work. Watch my space.
The 'Picturing the Body' module is drawing to a close soon (officially that is) and in the following few weeks I'm thinking of curating some of the work together into something of a collective piece. At present I'm thinking this will take the form of an online print-on-demand book/catalogue/magazine, most likely using a company like Blurb, also with an online version that can be passed around quite easily. Considering that some strong work has been produced both within and external to the university it seems to me worthwhile to try and bring it together, and have something significant of this project as a whole.
So to all Picbod contributors: please feel free to send me your work for consideration (use email on this blog, or add a link with a comment). This could be your selected final images; or your 'best of' from the weekly tasks; or if there is just one theme which you've been following strongly then send that; basically anything which you feel confident about, and which you feel is relevant to the picturing the body module (image sizes of around 1-3MB should be fine). Obviously spend some time 'editing down', I can't look at everything, I'm only human! I have been going through the links from the picbod post on the New Photographics blog and plucking out images of interest to start making a rough edit, and getting an idea of what you all have to offer.
I'm also open to receiving writing pieces for the book. This could be writing to explain your own work, or to discuss the themes it focuses on, or it could be writing on the themes in general as discussed and lectured on during the module, or it could be writing on someone else's work within the module, whatever has moved, intrigued or excited you whilst we've been doing this project. Probably best to keep this fairly concise, say 250 - 1000 words approx.
Please note their will be no positive discrimination to those in the university or those who are my 'mates'. The work will be biased in the sense of my 'curatorial opinions' as to what will go towards a strong collective piece. This means that some people's work may feature more than others, and some may not feature at all. I think it is better to have a collective piece which speaks strongly of the module and this collaborative project/exhibition overall, rather than assigning everyone an equal space in the name of fair. Having said that, I would hope that all those who have been engaged with the module will have a place in this piece.
Currently studying a masters in photography at Falmouth University, and a recent graduate of Coventry, Ross Rawlings has been a keen participant of the 'Picturing the Body' free online course. His work can be seen here.
I followed Ross's work online as he went through the 'picbod' course and tackled each of the weeks briefs. There was some positive and engaged discussion on his week two work, which inspired me to write this comment piece, however I've waited till now to write it, because I wanted to see where Ross would take the work (also gives me more material to discuss). So for week one he started with some clearly considered environmental portraiture, demonstrating confidence with his process of engaging people for the camera. It was encouraging to read about.
For week two Ross made use of his method of coupling to the purpose of "creating a narrative, and an image that leaves a lot of questions unanswered." The work was responded to well and lots of talk was taken up around this idea of narrative. Personally I think narrative is not quite the right term, I think of it rather as 'suggesting'. A connection is suggested across the two images, the light leads me to think it is something ethereal or dreamlike. The narrative is to come later, with a greater number of images, when more can be inferred from the work. That is my take on it anyway, it's a term which is banded around quite a lot in photography and open to varied interpretations/uses.
There is no doubting that Ross's technical ability is flawless. He has developed and identified his own style of light – the best word I can think to describe it is 'pearlesence'. And I find his posed photography, where he locates, controls and utlises this light, to be most striking. There is a distinct emotive feel which runs through this work, I struggle to pin it down, but (as others have identified) I can relate it to Rinko Kawuchi's photography. I had a go at arranging some of my favourites.
In the week two comments Ross mentioned an open narrative and leaving interpetation to the viewer, he then expressed a desire to present a clearer narrative. Seeing as he has now achieved a succession of strong work which is identifiable to his name, I wonder if this can be done. If he can bring together a body of work with meaning behind it, open-ended or resolved.
Seeing that the deadline is approaching, I've started to consider what to submit for the Picturing the Body exhibition, and feeling that I have a strong body of work to draw from, I've experimented with a few different methods for editing that work. Sequences, montages, mixes, single images, and the method which has stood out most, (and hence which I'm carrying forward) collages, or grids.
Considering the reduced size of the individual images, and the fact that I still wanted those images to be seen in detail, meant that this collage would have to be seen big. So I had a go at projecting it, taking up as much of a clear wall as possible. In this space the image held quite a presence, and so I began photographing that, and then this became the image, or rather is this now the exhibition?
Inspiration for this image came from Hiroshi Sugimoto's work of long-exposed cinema screens.
I then thought to put myself in the picture, contemplating my own work, naked of course. The body in its natural form, considering itself in its natural form, but presented in a very unnatural way. Fascinating to see how the colours of the image become more 'real' when projected on to human skin. I am particularly fond of the eye line in the last picture.
Weston was an early 20th century photographer, most famous for his abstract images of natural forms, nudes, and landscapes. His nude work is not quite macro, and I feel it has more of a pictorial consideration than my own, but it does lean toward the obscure. This manipulation of the human form both physically and with camera/lighting tricks, is what attracts me to Weston's photographs. Due to their pictorial nature, I think his works with nudes are really trying to achieve something different to my own, I wouldn't even refer to my work as being nude. Though I do like Weston's understanding of what the human form can give as a subject,
"I am stimulated to work with the nude body, because of the infinite combinations of lines which are present with every move,"
As I had decided at the end of the last shoot, I wanted this project to be about me, to be about a photographer using their own body as a subject to be scrutinised, and hence delivering a statement which isn't critical of another individual, but instead approaches from a universal viewpoint, observing the human form.
Looking over the images I'd already taken, and starting to consider how the work would come together for a final piece, I could see a benefit in making some more images using my body. This will give me a broader selection of images to work with when it comes to editing together an exhibition piece. I also wanted to revisit a few of the 'poses' to see if I could develop them, or improve the light.
The shoot was a success. With the experience of the previous macro sessions, my assistant and I were able to jump straight in there and make some exciting pictures. Pooling these with the previous bodyscapes, I now have a large and strong body of work. From here it's just a question of how or what to edit them into for an exhibition...
I was recommended to look at the work of Ron Mueck, known for his large and very life-like human sculptures. Trained as a puppeteer and model maker he entered the realm of fine art with a desire to make very realistic sculptures. There's lots of comment around his work, both critical and appraising, also opinions like "his imaginative figurative sculpture speaks directly but also poetically to fundamental and universal concerns: how did we get into these isolating skins; what is it to be a person, touching others but still separate?"I don't know about that to be honest, but what really caught my attention me was looking at these photographs of his sculptors in situ.
I was very taken aback when seeing them for the first time and suddenly realising that what could have been a human was in fact a huge sculpture, and the little people observing it – they were the real ones. Just from looking at these small images of the exhibition, really provoked a strong reaction in me. And although I found it very disorientating and disconcerting, I have to say I really got a buzz out of it. I wonder if seeing the sculptures in the flesh would have a similar effect, or is it the discreetness of these small photos that is key to evoking shock and surprise.
Either way, Mueck's work is very relevant to my own, because again of this use of scale to alter perceptions – to 'throw off' the viewer, and when it's done with the subject as the human body, that is particularly impacting. This process, this ability, is something which greatly enthuses me. I can't say how well I have achieved it with my macro work, I may of only started to find it in certain images, or even just in elements of certain images, but I think it is a very valid concept to continue considering as this work develops.