PPP for short, is a small module (the last of my course) which focusses on the process of taking ourselves, and our work out of a university context and into a professional one. It will be tagged on this blog as 'professional portfolio'.
I wanted to begin posting on this with a look back to some professional work that I've done, which although it doesn't relate to my own current practice, it certainly does relate to an area that I am keen to pursue – filmmaking.
Occasionally throughout the year I work with my cousin Jonathan Lee, (a freelance videographer, photographer, educator and such) to produce judicial training videos. I've written about this work before, but I wanted to bring it up again, as due to the job repeating, I have grown to be quite confident with the technical set up and running of the shoot, not to mention keeping calm when working with the high powers of the law system (no actors here).
Once my schedule frees up with the completion of my course, I would like to commit some of that time to further opportunities of assisting on such film work, with my cousin and other media producers. Below is a clip from the final film.
There was a big step between this and the previous pixel-portraits. That difference is down to the use of blending and shading. Until now I have mostly painted using block colours (because I initially needed to determine the principal areas) and of course this colouring is not particularly realistic. Now that the face layout has been defined, I have been able to mix these colours – by varying the opacity of brushstrokes between colours, and then overlaying them – to give a gradient of tone to the skin. This then allowed me to begin utilising shading, which in turn gave depth to the features, and advanced the level of realism of the image.
Pixel-Painted Self-Portrait #6
As the portrait progresses, its development is slowing. The sessions now take the better part of a day, and the level of detail (now working with brushes as small as 2 or 3 pixels in diameter) means that the changes are increasingly subtle. When I started the project I had no completion date in mind, as I was aware that the process of this task was very much an unknown, and to aim for a realistic looking photograph made by painting pixels could take an incredibly long time.
Hence for the upcoming degree shows, I will present this project as a work in progress. I see this as a good thing, better in fact than if I were to present a final and resolved piece. If I can find a way to neatly exhibit the six successive pixel portraits in an online gallery (see below), then an audience can engage with the project's evolution. And then there is the potential to generate interest in the subsequent development and outcome of the project - an opportunity for the work to acquire a following and have life after these upcoming shows.
(adding shading to the eye area)
Self-Portrait with Mirror and Pixel Canvas (after Johannes Gumpp)
Johannes Gumpp Self Portrait with Mirror and Canvas
An effective presentation of the pixel portraits for now, is as a short slideshow, with a a slow cross dissolve between each image - which becomes especially effective towards the end when the transition is less noticeable. Enjoy.
Recently I had the idea to add an installation piece to accompany my planned exhibition work. In short this piece will consist of a tall plinth/box, mounting in one side a two-way mirror, behind which is a video camera, which gives a delayed output of 1 minute or so to a monitor on the other side of the plinth to the mirror. In other words it will allow a viewer to look at, interact, confront, pull faces to etc. their reflection and then have the opportunity to watch it moments after, from the mirror's/camera's point of view.
There are several reasons for this decision. My self-portraits made using a two-way mirror, will appear, and may be thought of, as simple direct studio portraits. This would be a shame considering the effort applied in that setup, and the theory behind the work which is strongly connected to the mirror and the reflection. Including the mirror as part of an installation will then help in elaborating the process and motives of producing this work. An interactive element to a show is almost always a good idea, it gathers the audiences interest and helps them to feel involved, and hence more connected to the works on the wall. In the case of my two-way mirror images I feel that this installation, if accompanied by a suitable and simple explanation, could encourage the audience to participate in a similar self-mocking behaviour to my own. And furthermore, this participation could then greatly assist the audience in understanding my rationale for producing this project.
This diagram shows the design of the installation piece, including an internal layout. The plan has been submitted and approved by the wood workshop technicians at University, and I will proceed with construction next week. Arranging the video delay aspect of the piece has proven a bit more challenging. Such editing effects, are best done through a software program called Isadora, which was designed by performing arts practitioners to use in multi-media and video installation performance pieces. It is an incredibly powerful and complex program, utilising a sort of flow chart design of any 'scene' you wish to create, and with a huge number of 'actors' - each of which produces a different effect. Thankfully a video delay is quite simple and can be seen in situ below. There is also a 'capture control' actor, which in line with setting up power scheduling on the computer, means that the installation will be fully automated, turning itself on in the morning and off at night (hopefully), and therefore saving me the need to unscrew the side panel each day.
Today was the first session with a two-way mirror in the studio. The experience is best described as a learning curve. Two-way mirrors do not easily provide the clean unhindered visual trick as seen in the movies – they need coercing into behaving correctly. Today I got close, but there is still a significant problem with reflections on the camera side. However I have a cunning and very much 'home-made' idea to solve this – we'll see from the next shoot if it succeeds..
Determining exposure was also awkward, because shooting through a piece of partially transparent acrylic reduces it by approximately two stops – as I found out through trial and error (pre-visualisation can only do so much in this case).
As well as progressing with this test process, I also managed to get a bit of 'behind the scenes' video thanks to my course mate Mino being on hand to shoot it. And this gave me the chance to explain some of the thoughts and motives behind the project, and also provide a peek at the set-up (accompanied by cheesy music and everything!)
The people depicted here are my family. The story takes place from Summer to Winter. This is a short film I made using stills of their activity with each other, and with the outdoors. The most enlightening and exciting element of producing this was working in collaboration with the composer Brendan Beales. The photographs - their timing and running order - were edited to silence, I then provided Brendan with a total running time, as well as times for various cues and I gave direction for the mood, tempo, and tonality of the music. He did not know which images he was writing for until the piece was completed, this was to avoid 'mickey mousing' the music. Essentially, this production has highlighted for me the pleasure and ability I have, working in collaboration with others towards a larger creative goal. The film and television industry calls all the louder.
I'd like to point out that many of the words here are in reality David's, which I have tried to write up as best as possible and still do them justice.
David Gray’s talk on self publishing was given in two parts – relating to the two differing perspectives he had to adopt: as the photographer, and as the publisher.
As photographers, he encouraged us not to worry about attempting to ‘meet a market’. With the opening and freeing of the medium, and crucially the accessibility of the technology, self-publishing is now a valid and worthwhile venture, and one that can give conventional books a run for their money – if done well enough. It is important that artistic practitioners recognise this potential, and consider it when undertaking their next project. You don’t have to rely on a magazine/publishing house/high street gallery anymore, nor you should you feel the need to put all your hopes with them.
David talked through his projects, and the self-reflection and criticism that was necessary to allow the work to progress; aiming to each time improve the delivery to the viewer, whilst still maintaining and celebrating the ideas which he felt were key to his style. A good example of this can be seen from the progression from the Cunawabi book to The Dream that Days Break series; where the use of writing in consideration with the narrative, went from caption-less images, accompanied by a sheet of fragmented poetry – thereby giving a very un-prescribed (and open to viewer interpretation) story; to a more formally delivered piece of writing at the front of the book which gave a greater sense of meaning to the images that followed. This idea of photography and writing as equal – as aspects of a publication which do not rely on, but support each other, as well as standing alone – was something that David strived towards after finding that people weren’t quite ‘getting’ the narrative of Cunawabi to the extent he had hoped.
When it comes to publishing, a very different and much more disciplined mindset, than that of the free-working photographer, is needed; particularly as money is now of prime concern. David identified four predominant areas to be considered for production: design, the product package, paper, and printing. And he had many tips on how to tackle them; the sum of which was firstly to keep organised, and secondly to build a strong relationship with those that can provide these services. Here the idea of trade for trade was highlighted – all companies need pictures, pictures we can provide in return for discount, paper and printing manufacturers eager to test out their paper and keep sample copies. An additional third point would be to consider learning things yourself, becoming self-sufficient, it’s not possible in all circumstances but David taught himself how to frame his prints.
The next difficulty for an independent publisher is that of distribution. The way to tackle it is to aim for a smaller, more direct audience; and this involves targeting a small number of key distributers (bookshops, book-fares, galleries) and again maintaining a strong relationship with them. One of the greatest advantages a self-publisher has – and should make use of – is their quality of customer service. Personalised messages, handwritten responses and the like go a long away in keeping purchasers not only satisfied, but then interested for the long term. David also stressed the power of the third party, the benefit received when others are responding to and reviewing your work, because of the community of interest that builds up around that.
Overall, David provided a talk which emphasised the necessity for hard work and disciplined effort with projects, but at the same time the importance of enjoying the projects and pursuing the ideas that you are passionate about. In short, and as David summed up – be strict with yourself, and have fun.
Following the talk and the questions, the class had more of an informal conversation with David. A few other things that he mentioned as important to a photographic practitioner, was the significance of finding something untouched and with a personal connection to explore. Also the advice to keep up with self-driven projects after graduation – even if they’re not selling they will be profiting – try to think of it as commissioning yourself. The brilliance of working this way, is the freedom from commercial pressures. As Ansel Adams puts it: “There are no rules for good photographs, there are only good photographs”. David points out that the same applies with books and so, provided there is enough motivation, confidence needn’t be lacking when self-publishing. David has been greatly assisted in his publishing endeavours by his acquired knowledge and confidence of graphic design (which has also provided him with an income to support his creative work). But this should not detour others who don’t have the skills, simply look to David’s approach to new challenges: one of not accepting defeat easily, and a willingness to learn even when against the odds. All in all David was a very encouraging practitioner to talk with, especially from a student’s point of view. His ability to relate to a student’s position with positive advice was incredibly beneficial to a group soon facing the uncertainties of graduation.
Myself and a fellow photography student Oliver Sharpe, have been working in collaboration with 3rd year theatre students at the university. The theatre students were working on their final production for which they needed marketing, promotional, and 'head shot' photography. We saw it as an opportunity to hone our lighting skills and try out some new techniques with an exciting theatre group.
I found working with Ollie to be hugely successful. As a pair (when photographing a large group of people) one of us could take charge of the camera and work with the subjects - concentrating on getting the best shot, whilst the other could concern themselves with all other aspects of the job - checking lights, moving backgrounds, making tea and so on. At a certain point we would swap roles so as to keep the work load balanced and to prevent task fatigue. There is a lot to be gained from having a team-mate who is empathetic to your mode of working, it makes the job a whole lot easier.
I also found the experience of working with a group of theatre students to be beneficial. They take direction well and are comfortable and patient in front of the camera. The challenge was in getting them to appreciate that with photography their acting would now appear as static, rather than dynamic as with theatre. Or in another frame of mind - the challenge was on us to present a still image which did justice to their dynamic performance. People skills and patience were a must with this work, we did make a few mistakes - particularly with the first shoot where we asked everyone to arrive first thing and then they all had to wait whilst we fuddled about with lights - always give at least an hour for set-up before anyone arrives. Thankfully we had a positive and committed group to work with, which made the process enjoyable as well as informative.
Most of the better images went to the theatre team, but I have a few samples here:
My cousin Jonathan Lee works in the creative industry, as a video maker, artist, educator and other adventures along those lines. One such job he has acquired is working for the crown court producing judiciary 'training videos'. In other words a senior judge dreams up a variety of challenging situations (contradicting laws and such), writes a script, a group of barristers and other judges are hired to play it out, and then Jonathan films and edits the 'trial' into a neat training DVD. Quite a lot of work for one guy, so considering the limited time there is for shooting, he hired me in as an extra hand. I've not done a great deal of filming work before, or certainly not to this kind of professional standard, so at first it seemed rather daunting. However, I soon got to grips with the tasks whilst Jonathan could manage the overall project; he is a very reassuring leader in this way - allowing me to take on tasks within my capability thereby saving him time but still supervising the work at hand.
I picked up a few new technical skills from the specific tasks I had - controlling the 'boom' microphone, and as a secondary cameraman, but the most notable learning I gained, was observing the complexity of film work when there are actors, a set, lighting, a script, and a limited production time, all to be considered and controlled. This complexity is kept in check largely by people management. The director/producer must succeed at two distinct challenges: firstly to produce a coherent piece of video (getting the right shot, well lit, timed etc.) and secondly keeping everybody on set happy (this is especially challenging when there are senior judges and barristers in the room!) Jonathan, I noted, is distinctly accomplished in both these areas - with his easy social air keeping the set very relaxed, and his experience and practised knowledge keeping the production on track. I found I was able to help Jonathan with this (once my confidence had grown) by keeping an eye out for overlooked technical issues, and also contributing to the casual atmosphere of the set (making the odd joke, reassuring actors and so forth). Essentially, a lot comes down to understanding the work environment you are entering into, and how best to behave within it so that everything goes smoothly.
As the assignment deadline is drawing near, we began this session with a group review and discussion of everyone's ideas and latest work, towards the aim of helping each other along with our final pieces. I hope the session was beneficial, I for one was very encouraged to hear some excellent and inspiring ideas followed up by thoughtful questions and suggestions. The important thing now is that we really make a good effort at realising these ideas - don't be timid - if you've got something that you're passionate about then go for it. I'm keen that next week we will all have more images to show (even if they are just preliminary or research) so that we can get a stronger sense of where everyone is headed.
Following the review, I invited fellow second year student Joanna Ornowska to come and talk to us about some of her work. After the assignment to 'document a meeting' was set, Joanna's photography (in particular her Park Portraitsseries) came to mind. We asked about and discussed with Joanna her methods of approaching and directing strangers, her considerations of light and composition, and the technical challenges she dealt with. All of which was very insightful, and I hope useful to the group.
Her photography of strangers she meets is continuing - at the moment it's couples walking on Welsh mountains - and there is also her more personal and intimate project Awake, looking at her family life during and after her illness with hepatitis C and skin cancer. Joanna shows a great level of dedication to her projects, which is reflected in the quality of her pieces. Each time I see her work I am inspired to better my own.
For the remainder of the afternoon we had a flashgun workshop with Kevin, which I will endeavour to sum up here:
The power of the flashguns can be stepped up or down by 3 stops (above or below the ambient exposure) so they can be used as a subtle fill light, your main light , or for an over-exposed effect.
The lights can be used on-board and off-board - mounted to light stands or tripods, using super clamps, magic arms, or just the foot, or you could even get an assistant to hold it.
They can be altered to send light in different manners - direct, bounced, diffused, or coloured using gels.
There are different ways of firing them remotely: using a radio trigger; using the 'SU 4' setting (similar to the 'cell' function on the studio heads); or using the flashguns' in built radio signals - which means setting one flash as the 'master' and the other(s) as 'remote' (remember that the master can be the camera's own flash).
Different models and brands will vary in settings and terminology, just to keep it confusing for us.
You'll need to provide your own batteries (usually AA) and ideally they should be above 2000mAh (milli-amps).
All of this might sound a bit techno mumbo jumbo, but as with any new equipment the best option would be to take it out and have a play. The crucial thing to remember is that these are just lights, apply the same principles as you would with studio lighting and don't over-complicate things. Again the Strobist blog is a useful resource, try the 102 lighting archive. And Kevin also mentioned the website of Ken Rockwell, who seems to know his camera equipment through and through and provides a review for just about anything.
Following our peer session yesterday, this post will outline some of the considerations we should take when using studio and location lighting.
It's boring, but it needs to be covered, so: Safety First
Don't plug the light into a battery and the mains at the same time.
Make sure your light is securely attached to the lighting stand, and when moving it, carry it by the light not the stand (which one is going to break if it falls off?)
A tip when attaching the power cord, is to wrap it around one of the feet of the stand. This way if someone trips on the wire, the light is less likely to topple over.
The higher you raise the light, the more unstable it will become. Weigh down the legs with some handy sandbags, or get an assistant to hold the stand (especially if you're outdoors, windy, umbrella, Mary Poppins etc.)
When setting up the stands give the three legs a wide spread for stability, also with the light on top allow the weight to 'settle' the stand so that it's not under too much pressure.
Avoid touching the bulbs, they're delicate, and the grease from your fingers is not good for them. Also the modelling lamp in particular gets very hot - try not to have that on for unnecessary amounts of time.
Take care when attaching/removing the various reflectors (or 'heads') - they will get hot from the lamp. The black plastic bulb covers are for storage purposes only. They will melt very quickly (and expensively) if you use them with the lights on.
Basics with using the Lights
With the 'cell' button on, the light will trigger when it detects any other flash in the room.
The 'beep' or 'sound' button will mean the light makes an indicating noise when it is charged and ready for the next shot.
The modelling lamp has different settings ranging from: off, half-power, equal to flash, to full power. The modelling lamp is primarily there to help you get an idea of where and how the light is falling - where the shadows will be etc.
The light needs to be synchronised to fire at the same instant that the photo is taken. This is done with either a sync cable (from camera to light) or radio triggers (a transmitter on the hot shoe of the camera, and a receiver in the sync socket of the light).
If you lower the power of the flash you need to 'dump' the charge to reset it.
Some Further Tips
There's a whole varietyof different heads to attach to these lights, which will alter the angle, the spread, the diffusion, the intensity and so on. The best way to find out what different effects these have is to test them out. Yesterday we found that having an umbrella closer to the light source will give less 'spread out' light, i.e. more defined shadows, than having it further away.
Keep it simple, if one light will do the job then use one light. It starts to get complicated when you've got multiple flashes going off, and you're trying to keep them all balanced and stop them from spilling into each other.
If you are using multiple lights then perhaps work by 'building up' the picture - start with your key light and get it the way you want it, then add the next and get it balanced, then the next and so on.
Make use of reflectors and gobos, to bounce back and block off light - give yourself more control.
If you're working in the studio it might be an idea to isolate the subject from the background, so as to control the light/tone of them separately.
Use your light meter, and use it wisely - arrange things carefully and take lots of readings. You should have a good idea of how a picture is going to come out before you go near the camera.
Remember everything is a variant. If something doesn't look right there are numerous ways you can alter it: the power of the light, the angle of the light, the distance between light and subject, the position of the subject, the position of the camera, the exposure of the camera, the list continues.
Here's a good video on Dean Collins (a master of lighting) working on a portrait. It's a bit geeky and technical but it's particularly significant to what I was saying about 'building up' a picture. Also note how he talks through the picture with his assistant - some awesome pre-vis skills.
The original link from the strobist blog is here. Do check out strobist, and their series of posts - Lighting 101.
Some more videos which go over the range of equipment you can use with studio lighting.
There's also studiolighting.net and a bunch of others, google it!
But remember, when researching this stuff you are frequently going to run into 'experts' telling you that "this is how you make someone look sexy" or "never use a tripod and always shoot at f5.6" - ignore them. It's not the case that one type of light is 'attractive' and one isn't. It's that there is soft light, and harsh light, restricted, spread, diffused, directional and many other types. It is up to you to decide how to use lighting, to create the effect that you desire. Learn from others the technical, teach yourself the creative.
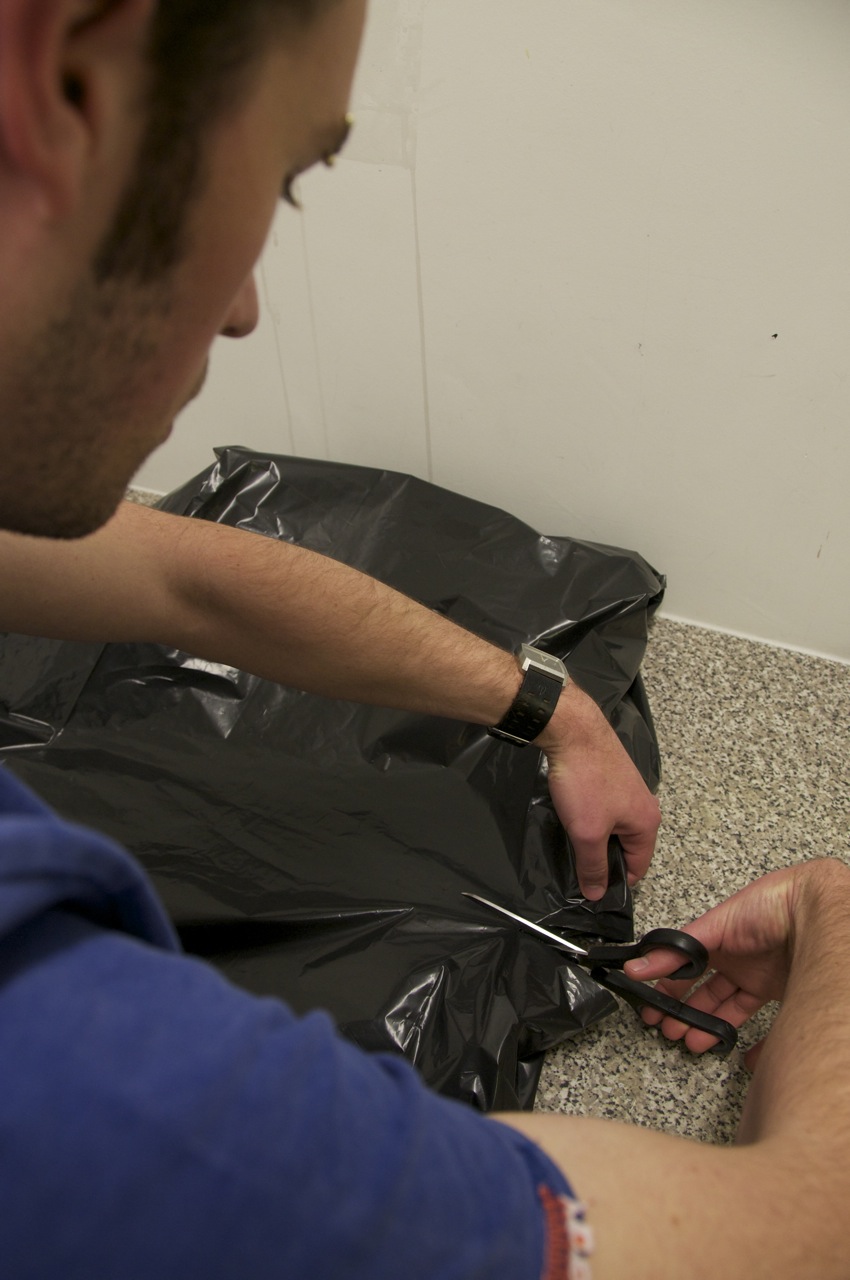
A changing bag in photography refers to a light-proof portable container with 'sleeves' which allows for work with photosensitive materials when a darkroom isn't available, for instance loading film onto spools, or into a developing tank, retrieving damaged film, or even reloading pinhole cameras. These bags can be purchased for somewhere in the region of £10 to £30. Or you can go for the very cheap, very simple, DIY option.
You will need the following: 3 black bin bags, a fairly light-proof coat (stick it over your head and stand outside to check), sticky tape, rubber bands, and scissors.
The steps are:
Put one bin bag inside another, and square them up nicely (a single bin bag is not particularly light-proof, but two together are).
About half-way down the bags cut a slit each side, around 10cm long - these will be your arm holes, and be sure to cut through both bags.
Use sticky tape to stick the two bags together at these openings - this will help to keep the holes in line.
Take your third bin bag, cut the bottom off and cut it in half. These two pieces will be used as sleeves.
Insert the sleeves into the holes on each side, and tape from the inside (turn it inside-out to make this bit easier). Once turned back out, it should have a good shape to it.
Place the coat into the bag 'head-first' and put the coat sleeves through the bin bag sleeves.
The changing bag is now ready to use. Put the paper/film/camera in via the bottom, and then fold or scrunch it up and seal it with an elastic band.
A group of us went out with the bag to work on our street pinhole photography. Working with a changing bag involves a bit of fumbling, but with a bit of practice we were able to reload quite quickly and hence take several pinhole pictures in one outing, and no paper was fogged!
The other part of the day with the 'Working with Light' group, was spent discussing last week's inspiration film and lecture, followed by a quick workshop Q&A on using a light meter. Further technical assistance with pinhole work, exposure reading, lighting and so on, is scheduled for following weeks and also available on request.
This session included a variety of activities all pertinent to our understanding and application of light - to understand it technically, and then to explore applying it creatively. We had a session with Wonathan in the studio with light meters and ambient lighting, doing some basic portraiture (hatchet lighting, silhouette, exposing for shadows, exposing for highlights). To recap when using a light meter:
positioning is important - light/shadow can alter dramatically over a short distance, make sure you get close to your subject (if it's a person I always favour plonking it on their nose).
likewise angle - the meter will read all the light falling into it from the area it is facing, hence it will most often be facing the camera (but not always, there's no rule here)
the meter will always measure at Zone 5 i.e. give exposure settings such that the metered area will be exposed as a mid-grey tone, or in other words 'correctly' exposed. Zone 0 is complete black/shadow, Zone 10 is complete white/highlight.
the meters give precise aperture readings with increments within the f-stops. For example a reading of f16.9, or f16 and a full bar, pretty much means the next stop up - f22.
We then had an exercise outside looking at natural light, observing its changing behaviour as we move in, through, and around a space. We experimented with a few shots, and this led us to think about image management - how are you going to frame a given subject? Are you going to move the subject within the light? Or alter the light? It's very important to note that there is no right answer to a well lit or 'good' photograph. Lighting will be taught as a technical skill, how it is used and applied is up to you. Keep your eyes open and take notice of the behaviour of light around you. You will start to predict how a given scene will be exposed in a camera, or how you make use of a certain light with a subject. This is pre-visualisation - understanding the difference between the eye and the camera, and as with anything it comes best with practice and experience.
This week's lecture looked at a range of practitioners' work where light is used as more of a defining feature, rather than a taken-for-granted element. Quite a lot of practitioners' work was shown, and hence a lot of ideas and potential inspiration passed on. I'm just going to pick out a few which stood out to me, and try to sum up the overall message of the lecture, I'm hoping to hear from other students of 'light defined' work which has inspired them.
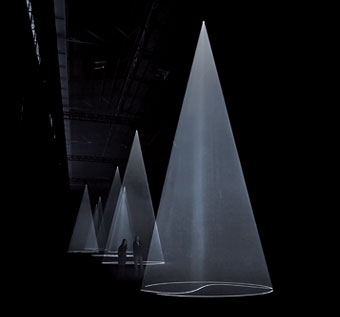
Anthony McCall's, and James Turrell's installation pieces encourage interaction and appreciation of light in a pre-designed space or environment. Shonathan referred to these works as 'Light as the subject'. James Turrell said:
"A lot of people come to art and they look at it - and this is one of the problems of contemporary art - they don't actually enter the realm the artist was involved in."
We then moved on to look at work which used 'Light as a Measurement of Time'. This began with Eadweard Muybridge's sequences of humans and animals in motion. His work effectively paves the way to the concept of video (moving image from numerous stills/frames a second), and other effects such as time-slice, and the famous bullet-time from The Matrix.
Eadweard Muybridge
Harold Edgerton was one of the first to use high speed photography, precisely synchronised to capture a moving bullet - amongst other things.
Harold Edgerton
Anton Giulio Bragaglia
Anton Giulio Bragaglia invented a process that he called 'photodynamism'. He was interested in portraying time and movement as an indivisible reality rather than segmenting or fracturing it into moments. This leads us quite nicely to Jonathan Shaw's work, which draws upon many of those mentioned above, and as he states on his Twitter bio - "I drill holes in cameras and pull them apart to make pictures which explore photography and time." A favourite piece of mine is Gallery 13, which was shot in the same gallery it was shown in, thereby exploring the viewers relationship to the work through their sense and awareness of the space in which it (and they) reside.
This finished off our lecture on 'Playing with Light'. A further link is to Michael Gondry's music video for the Rolling Stones - made entirely from stills.
Inspiration - Obsession
The final thing we did during the day was to watch John Waters' film Pecker: a light-hearted venture following the story of a happy-go-lucky obsessive photographer, and the consequences to his life when he makes it big on the art scene. I unfortunately missed the end of the film, and so would be grateful for other students to post their reviews/opinions on it.
Next week Shonathan has asked us to stick up on the wall a sample of our work produced so far for this module. The aim I think is for everyone to share their experiences, ideas, inspirations, successes etc. to date, encouraging this attitude of shared learning. And hence we should aim to stick up absolutely everything we've been working on that's interesting, regardless of any fears we may have of it being scorned, or thought of as a 'poor' image. Our peer session on Wednesday will be a chance to prepare for this group critique.
We'll also have a look at this week's portrait task - which as Wonathan put it - "is to return to your chosen street location, and investigate a character who exists within, or is involved with that space, by photographing them."
Most of the class have had little to no trouble in making a working pinhole camera. An area I'm going to cover briefly here is using a light meter with pinhole to achieve more reliable exposures. I'd recommend this considering that it's not so simple to reload and re-shoot your cake tins and matchboxes, and it's worthwhile having the confidence to get a shot right first time.
As we know, there are three variables which will determine the exposure of a photograph - the shutter speed (which we can easily control) the ISO (which we know depending on the 'negative' we're using - film/digital back/photo paper) and the aperture (which we need to calculate). This calculation is simple:
Measure in millimetres the focal length (distance from the hole to the paper/film/sensor). If this is curved i.e. varying focal length then I suggest you take an average. For my cake tin it's about 135mm.
Measure the diameter of the pinhole in mm. Suggest you use a precise metal ruler with half mill increments to get a good estimate, and hold it up to the light to see the hole clearly. I estimated mine at 0.75mm.
Divide the focal length by the diameter, and this is your f number or aperture. So my camera has an aperture of f180. (135/0.75 = 180)
My camera uses photo paper - which generally has an ISO somewhere between 2 and 10. I was using Ilford multigrade and spent a bit of time testing that, and found it to have a sensitivity of about 4. If film it will be whatever the film is: 100, 400 etc. and obviously digital you can alter freely. So now you know two of your variables, you can use those figures in your light meter and the available light will determine the third - shutter speed.
It gets a bit tricky because most light meters do not go up to such high aperture numbers, so you may have to take a reading and then 'step up' along your f stops, doubling the time as you go to, until you reach your aperture number. For example if I get a reading of 1 sec at f22: f32 is then 2 sec; f45 is 4 sec; f64 is 8 sec, f90 is 15 sec, f128 is 30 sec; f180 is 1 minute, and hence a 1 min exposure.
An example of an aperture table can be found at the back of the 'Pinhole Pictures' handout (also found in the library) and this link explains the whole process nicely too:
Here's a pinhole picture I made with a four-way camera - holes arranged squarely, and paper coiled round in a circle in the middle. The negative came out like this:
It's then a simple case of contact printing that negative (with a test strip of course) to get your positive picture. Bear in mind that it's a good idea to have your enlarger fairly bright for this to get light through the paper, and you will need glass to keep the negative pressed flat and the image in focus.
With the award winning painter Paul Wright, we had a days life drawing workshop. The idea behind it was not to improve our draftsmanship, but to develop our capacity at looking, without a camera.
At first we were asked to simply have a go at drawing a pose, without any advice or tutoring – We did a variety of exercises: drawing without looking; drawing in one stroke; drawing just outlines; just shadows; highlights; drawing poses with a decreasing amount of time for each; drawing with our back to the subject - look then mark; holding the pencil loosely; using charcoal; standing back from the paper; and eventually we brought it all together with a 20 minute study 'final piece'. Looking at this compared to our first drawing, and I was quite amazed at the progress in just one day. The improvement for me came with an increased consideration to the marks I was making and their ability to represent, to portray, and most importantly to communicate the form of the subject. And this meant having to really study and absorb the form of the subject matter – learning to look harder. I don't know if the skills in observing human posture will transfer directly, but there is definitely a benefit to my skill of 'finding' a photograph.
The workshop was very enjoyable. It was so revitalising to work with the delightfully simplistic process of pencil and paper, to just scribble away, allowing expression to carry itself, and being free from wrestling with cameras and light and framing and computers and memory cards and focusing and tripods and cables and ... zzzz. Having said that, I returned home with a real creative buzz and immediately started taking pictures.
Interesting to pick up on – I can see now why artists use the naked body for a subject so often. A bowl of fruit, will most of the time just look like a bowl of fruit, not very dynamic. Whereas the human body has such massive potential for variety in its form, so much there to study, to look for, and so many ways of depicting it.